Cuttable LED strip: how it works, and where to install it
This article is also available in French: Ruban led recoupable comment ça marché
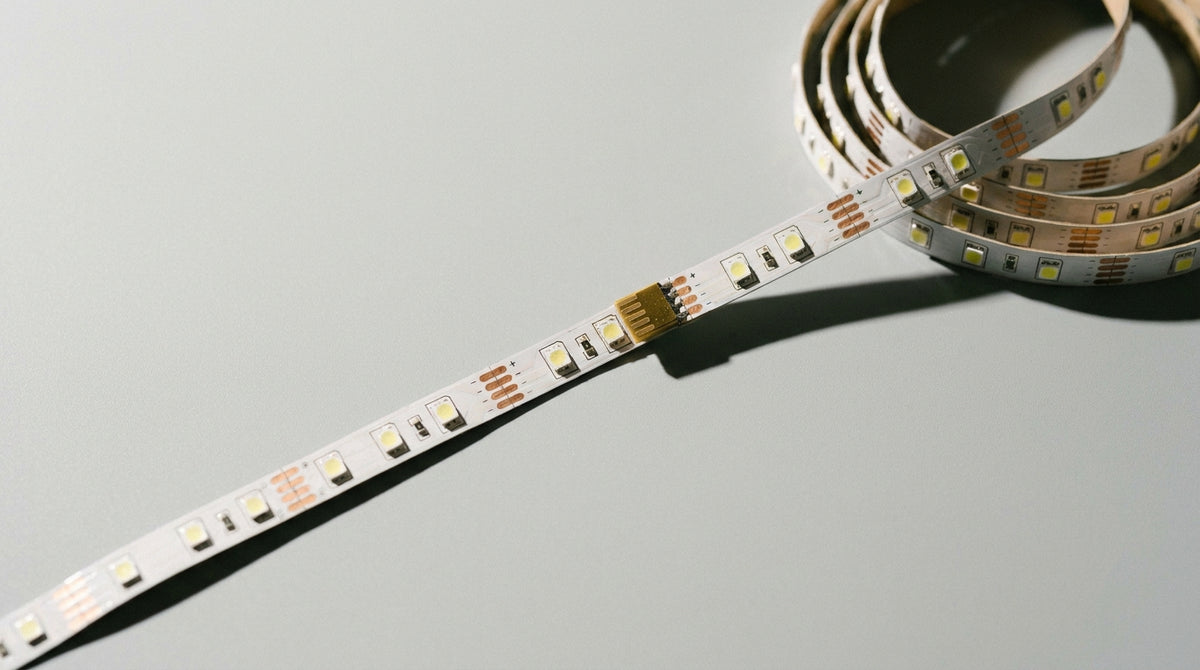
Look for the printed line on the strip, every few centimetres: it is the only place where the scissors are allowed to go. Between two lines, the LEDs are wired in series in groups, like so many small self-contained circuits. Cut on this mark and each piece starts again, powered normally.
How does a cuttable LED strip work?
A cuttable strip is a flexible band on which the LEDs are soldered in groups. Each group forms a complete circuit, closed by two exposed copper tracks. The printed line marks the end of one group and the start of the next. Cutting there separates two self-contained circuits, without leaving a single LED orphaned.
It is this logic that distinguishes a strip designed to be adjusted to your alcove from a strip sold at random. In our selection of cuttable LED strips, the choice is made on the result once installed, not only on the technical sheet: a strip is judged when lit, at the distance from which it is looked at.
Why is the strip made in segments?
Because an LED does not withstand just any voltage. Several are put in series until the power supply's voltage is reached, then this pattern is repeated all along. The strip is therefore not a continuous line of components, but a succession of identical loops.
- Low voltage: a 12 V or 24 V strip is powered behind a transformer.
- Series by group: within a segment, the LEDs share the voltage; the neighbouring segment starts again from zero.
- Repeated pattern: the same termination recurs regularly, copper pads included.
- Voltage drop: the longer the line, the more weakly its end lights. That is the real limit of a strip.
How does the current start again after a cut?
Two copper pads remain accessible on either side of the line: ground and positive. Two wires are soldered there or a connector is clipped on, and the power resumes in the next piece. Direction matters: reverse positive and negative and nothing lights up. The strip does not burn out, it stays silent.
Can you cut an LED strip anywhere?
No. Only the printed lines act as boundaries. Cut between two lines and the blade falls in the middle of a series of LEDs: the circuit is broken, everything after it stays off, and the piece kept may flicker or refuse to light up.
How do you spot the cutting mark?
Look for a thin line, often accompanied by a scissors symbol and two copper pads on either side. On a strip in its sheath or placed on a light background, the mark is hard to read: light the band at an angle and follow the line. The cutting pitch is indicated there, and it is what sets the useful length of each segment.
What happens if you cut between two marks
Nothing burns, nothing smokes: the strip simply loses its electrical continuity. The consequences are mechanical, not dramatic.
- Dead segment: the part after the cut is no longer powered.
- Flickering: a borderline segment lights intermittently, a sign of an incomplete circuit.
- No clean repair: a copper track cut in the middle of a series cannot be re-soldered.
If you are unsure about where the line is, it is better to check before cutting: our guide on where to cut an LED strip goes through the marking step by step.
And if the blade has already slipped, the article what can be cut and what goes wrong explains what to save and when to start again with a new strip.
What is the difference between an LED strip and a COB LED strip?
A classic strip shows distinct light points, each lighting its small cone. A COB strip carries a continuous layer of phosphor deposited on the band: the points disappear in favour of an even line of light. Same voltage, same cutting logic, very different result.
The visible light point, or continuous light
| Criterion | Classic strip | COB strip |
|---|---|---|
| Result | Distinct points, a bed of beads | Continuous line, without a break |
| Glossy surface | Reflections in a string of beads | Single reflection, blended |
| Cutting | On the printed line | On the printed line, often closer together |
| Ideal use | Indirect lighting, cornice, groove | Alcove seen up close, worktop, under-cabinet |
The phosphor layer also changes the way the light is distributed over a surface. Our article on COB LED covers this point in detail.
Which one to choose depending on the installation height
The rule comes down to one sentence: the closer the strip is seen, the more continuous it must be.
- Less than 50 cm away: COB, without hesitation.
- Between 1 and 2 m: high-density classic, or COB if the surface is glossy.
- Beyond 3 m: the classic strip gives a clean result.
The width of the band matters as much as the type of LED, especially if you house it in a narrow groove: everything is compared in our guide on LED strip width.
Where are you going to install your LED strip?
How many times can a strip be re-cut, and how do you connect it?
As many times as needed: each cutting line is a usable boundary. The limit is not the number of cuts, but what remains to be powered. A very short section is hard to connect, and a line too long for its power supply ends up weaker than it started.
Connecting an LED strip without a connector
Two wires soldered to the pads, a piece of heat-shrink tubing, and it is done. It is stronger than a clip, provided you do not heat the band for too long.
- Strip short, without nicking the copper.
- Respect the polarity: positive and negative, as marked on the band.
- Solder quickly: an iron that is too hot deforms the flexible support.
- Insulate then test before fixing the strip.
The full method is covered in our article on connecting without a connector.
Making up the lost length
When an alcove needs two separate pieces, each section starts again from the power supply: two cables from the same transformer, or a link cable between the two. A strip powered from one side only does not continue through a simple contact placed end to end.
Before ordering by the metre, have your length and your power supply checked: our team answers from Monday to Friday, and you can ask an adviser.
How do you integrate an LED strip without it looking tacky?
Hide the source, let the light show. A strip housed in a groove, an alcove or under a lip lights the room without showing itself; stuck visibly on a wall, it is spotted at first glance. The difference between the two comes down to a few centimetres of setback and the chosen shade.
Under a kitchen cabinet
This is the simplest and most useful use: the strip lights the worktop instead of the room. Set back under the wall cabinet, it disappears and the light falls straight onto the worktop. A shade around 2700 K stays warm and flatters food; 4000 K suits a working kitchen better.
- Set back: a few centimetres behind the wall cabinet door.
- Towards the worktop, never towards the splashback, otherwise you light the wall.
- On the existing switch or on a sensor, to switch on without thinking about it.
The step by step is in our article on the strip under a kitchen cabinet.
Under a shallow wall cabinet, a light bar does the same job with less preparation: our collection of LED light bars mounts directly under the cabinet.
As accent lighting in a living room
In a living room, the strip is rarely used for reading. It highlights: an alcove, a ceiling return, the back of a TV unit. The light should graze the material, not hit it. The same strip that brings a raw wall to life dazzles when it faces you.
For the general light that accompanies this atmosphere, a discreet LED ceiling light does the job without competing with the accent lighting.
A successful living room always combines general light, atmosphere and an accent point. Our page on living room renovation shows how to distribute the three without overloading.
On the ceiling, and in a damp room
On the ceiling, the strip is hidden in a cornice or a recessed joint and lights only by bounce. In a wet room, the question changes: steam and splashes require a high protection rating, IP65 for exposed areas, and a power supply placed out of reach.
- IP44 outside direct water zones, IP65 near the shower or outdoors.
- Power supply relocated to a dry zone, never in the shower.
- Mechanical fixing rather than adhesive alone, on a damp surface.
High installation is detailed in our guide to the LED strip on the ceiling. Outdoors or in a wet room, our selection of IP65 lights goes further than a simple strip.
In stock · shipping costs shown at checkout · up to 30% off in your cart


Ready to turn inspiration into reality?
Tell us about your room, your style and your budget, and we will show you the pieces that truly suit your project.
Get guidance in 30 seconds →