Connecting an LED strip without a connector: the safe method
This article is also available in French: Raccorder ruban led sans connecteur
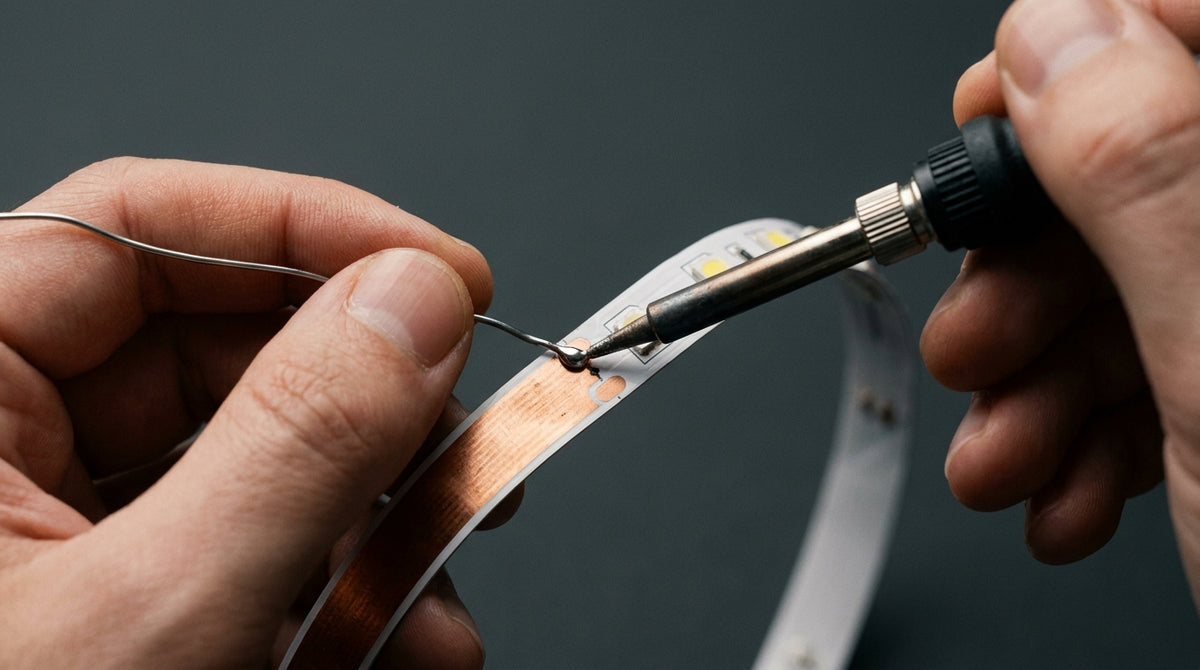
Solder the wires directly onto the copper pads, at the spot marked by the cut line: it is the most durable connection, and it needs no connector. Locate, scrape off the silicone, tin, solder, sleeve. Ten minutes is enough. A strip nicked anywhere else on its copper track will not light up again.
How do you connect an LED strip without a connector?
Cut on the cut line, expose the pads, tin them, then solder one wire per track, respecting plus and minus. Three methods exist: tin soldering, the piercing clamp, the splice. Soldering holds up better over time on a strip that heats up.
Tin soldering: the move in four steps
The iron heats fast and copper does not forgive overheating: a contact lasts one second, not three.
- Locate the cut line, printed at regular intervals, with its copper pads on either side.
- Scrape off the silicone with a cutter over a few millimetres, without biting into the copper.
- Tin the pads and the wires separately, with a fine-tip iron.
- Solder one wire per track, then sleeve it or add a dot of hot glue on the connection.
Once the connection is made, the strip disappears into a profile or behind a support, and it is the fixture that stays visible. Our selection of LED strips and fixtures can be browsed by use, from the under-cabinet strip to the wall light.
Mechanical connection: the solution without a soldering iron
A piercing clamp or a through-blade connector replaces the iron, provided the strip is new and accessible.
- Piercing clamp: it bites into the track, but taking it apart once is enough to weaken the contact.
- Through-blade connector: effective on a wide strip, unsuitable under 8 mm.
- Self-adhesive splice: useful for a quick fix, it peels off with heat.
- Common rule: the connection must never pull on the strip, leave a loop of wire.
Would you rather avoid the soldering iron? Describe your room to us and we will point you to the simplest solution to install, via our page to ask the team a question.
How do you wire an LED strip without a plug?
Go through a 12 V or 24 V driver powered from a plug or a cable outlet, never directly from 230 V. The driver input goes to the mains, the output to the strip. A 12 V strip connected to 230 V burns out immediately.
How do you wire an LED on 12 V?
The strip carries plus and minus markings printed at each cut line.
- Polarity: reversed, the LED stays off; it only burns out on a setup without protection.
- Current: an undersized driver heats up and loses brightness.
- Terminal block: a wall light or ceiling light uses the same markings as those of a bulb base.
Unsure about the wiring direction? Our page to wire an LED at home gives the step-by-step diagram, and how a diode works explains why reversing it destroys nothing. Socket identification is detailed in our guide on bulb size and base.
Connecting an LED strip to a switch
The strip is controlled by the switch of the circuit that powers its driver, not by a button placed on the strip.
- Parallel wiring: several strips share the driver, each one starts from the output, never end to end.
- Series: it is reserved for spotlights, the wiring logic is explained in our article on wiring spotlights in series.
- Wire gauge: a long strip needs cable, not a thin extension lead.
The dimmer, for its part, is only fitted if the driver accepts it: our feature on dimmable LED explains how to check before buying.
Where to cut and how to make an LED strip stay put?
Cut only on the cut line marked with two pads: anywhere else, the copper track is severed and the strip will not light up again. For installation, the original adhesive holds on a smooth, degreased surface. On a painted or porous wall, add clips.
Where do you cut an LED strip?
The cut line is the only place intended for cutting, and it repeats at regular intervals.
- Between two pads: the cut is made in the middle of the marked area, never on the pad.
- Waterproof strip: the silicone is scraped off before cutting, then sealed again afterwards.
- Length: at the end of a long strip, the voltage drop shows in the brightness.
- IP20: on a survey of 250 references from our catalogue as of 28 September 2026, 94 % declare this rating, which rules out bare strip for damp rooms.
Outdoors, the question changes entirely: our feature on outdoor lighting details the ratings to aim for.
How do you make an LED strip stay on a wall or under a shelf?
The hold depends on the surface, not on the brand of adhesive.
- Glass, laminate, painted metal: the original adhesive is enough after cleaning with alcohol.
- Plaster, bare wood: plan for clips or a primer.
- Under a shelf: set the strip back a few centimetres so the source stays invisible.
- Corner: an aluminium profile diffuses the light and protects the pads.
Under a shelf, the strip lights without ever dazzling. To dress a whole wall, a wall light requires less wiring and ages better.
Our Luminaire Led collection has 18 269 references as of 28 September 2026: enough to find the support that holds the strip.
LED fixtures and strips to integrate in your home


How do you install an LED strip on the ceiling without it looking tacky?
Hide the source. A strip placed behind a cornice or slid into a profile lights the ceiling without showing its diodes. Aim for a warm white, a moderate power, and a setup compatible with a dimmer if you want to lower the brightness in the evening.
Mounting heights and fixings are detailed in our article on the LED strip on the ceiling.
How do you calculate the power of a transformer for LED?
Multiply the strip's watts per metre by the length installed, then take a driver that works comfortably.
- Watts per metre: the value is printed on the reel, do not estimate it.
- Total length: adding up the metres gives the driver's minimum power.
- Margin: a driver pushed to the limit heats up and ages quickly.
- Consistency: our guide to calculating the lighting for a room gives the brightness benchmarks.
Connecting a 220 V LED strip: the rule that prevents accidents
Unroll the strip before any power-up, and cut only on the intended markings.
- Reel: a 220 V strip left coiled heats up and is destroyed.
- Cutting: the markings are further apart than on a 12 V strip, a mistake ruins the section.
- Bathroom: the power supply stays outside the zones.
To truly light a room, the strip complements, it does not replace. An LED ceiling light carries the main light, the strip underlines a line.
A strip is judged by the light it gives on the wall; a design fixture is judged by its shape when switched off. It is that second criterion that decides the result once the connection is forgotten. On a survey of 250 references from our catalogue as of 28 September 2026, the 2-year warranty and CE certification are declared on all 250 listings.
Unsure before choosing? The Designix Google listing is public. And if the strip is meant to compensate for the absence of a ceiling light, our article to light a room without a ceiling light gives the levels to aim for.
Where are you going to install your LED strip?
On the same subject
In stock · shipping costs shown at checkout · up to 30% off in your cart


Ready to turn inspiration into reality?
Tell us about your room, your style and your budget, and we will show you the pieces that truly suit your project.
Get guidance in 30 seconds →