Can you cut an LED strip? The method, mark by mark
This article is also available in French: Peut on couper un ruban led
Can you cut an LED strip?
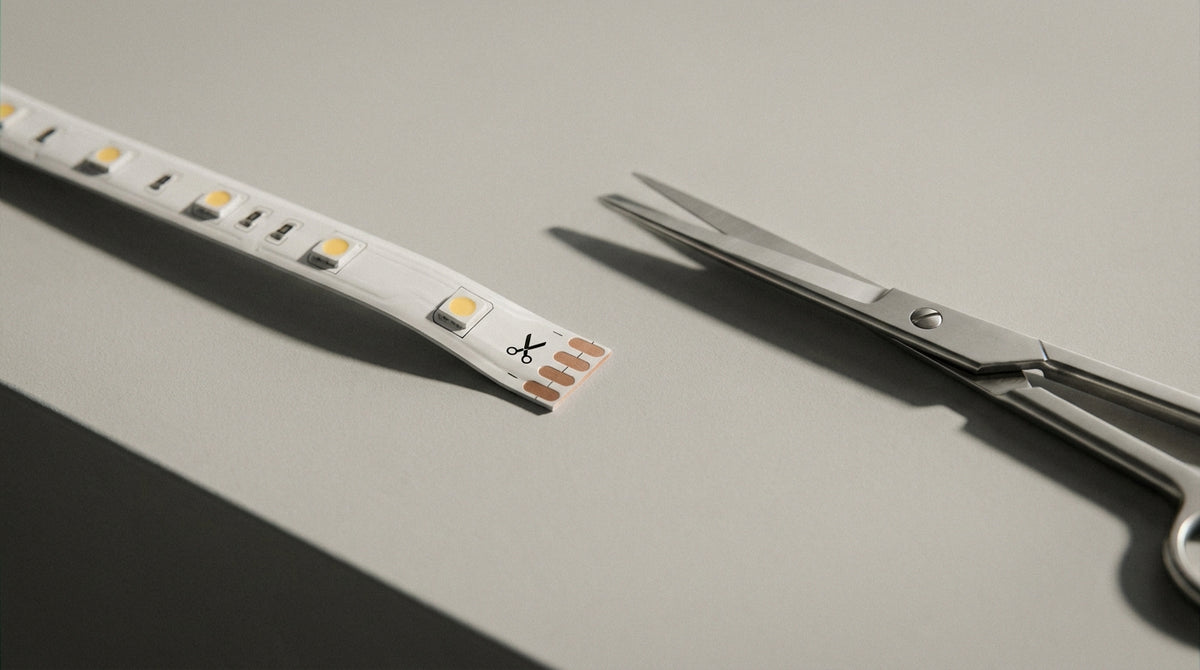
Yes, on one condition: cut on a mark, never at random. These marks are the copper pads or the scissors icon printed on the backing, spaced 5 to 10 cm apart depending on the model. Between two marks, the circuit breaks and everything after the cut stays off. The part you keep retains its original brightness.
An LED strip almost always gets trimmed at the end of installation: a 90 cm niche, a bookshelf back, a worktop edge. LED strips are designed for this adjustment, provided you measure before cutting and aim for the nearest mark, above or below the measurement.
Where the cut marks are
They are printed on the strip itself, at regular intervals.
- Copper pads: two exposed pads per group of LEDs, where contact is remade after cutting.
- Scissors icon: the same location, clearly signalled.
- Separation line: a break in the printed circuit, visible with a magnifying glass.
- Short pitch: the closer the marks, the more precise your final length.
Should you unplug before cutting?
Yes, cut with the power off and let the strip return to room temperature. Then fine, clean scissors are enough: the cut goes in the centre of the pads. Pliers crush the printed circuit and split the sheath. A craft knife also works, flat on a hard surface, without pressing on the LEDs.
Under a cabinet or a worktop
This is the use that forgives approximation the least: a strip that is too long overhangs the edge, a strip that is too short leaves a dark gap at the end of the niche. Measure the cabinet, subtract the thickness of the sides, then go down to the lower mark. The step-by-step guide to installing a strip under a kitchen cabinet details the installation and finishing touches.
If cutting seems too fragile, an adjustable kitchen light illuminates the same area with no cutting at all.
Can you cut an LED strip anywhere?
No. The strip is a flexible circuit: the LEDs are connected in groups, and each mark indicates the end of a group. Cutting in the middle lets current reach an LED that can no longer pass it on to the next. The entire section after the cut stays off, while the section before it keeps working.
What happens if you cut between two marks
- Downstream section dead: no LED lights up after the cut, even when powered again.
- Upstream section intact: it works normally, at its original voltage.
- Unreliable reconnection: resoldering on a split circuit rarely lasts.
- Weakened power supply: a copper burr against the backing heats the conductor.
An LED is not a bulb: what gets cut is the circuit, not the light source. The details of what actually gets cut in an LED help explain why one bad cut switches off a whole metre.
The case of 220 V strips
They can be cut too, but only on clearly wider marks: each section carries its own converter, and a piece shorter than the pitch will not light up. This is the strip most tolerant of length and least tolerant of mistakes. Moving from 12 V to 220 V also changes the whole installation logic.
| Strip type | Voltage | Cut pitch | After cutting |
|---|---|---|---|
| 12 V strip | Low voltage | About 5 cm depending on the model | Can be reconnected on the pads |
| 24 V strip | Low voltage | About 10 cm depending on the model | Can be reconnected, less voltage drop |
| 230 V strip | Mains | 50 cm to 1 m depending on the model | Cannot be reconnected per metre, cut in sections |
Going from 12 V to 220 V requires a dedicated box and a clean cut, with the power off.
The case of COB and RGB strips
COB strips, with their continuous light band, are cut on the same pads, often with a shorter pitch. RGB and RGBW strips have four tracks: cutting at the mark is still possible, but reconnecting means matching the wire order. Check the mark under the sheath before reaching for the knife.
Can you cut an LED strip that is too long?
Yes, and it is often preferable. A 12 V strip that is too long loses intensity at its end, and a 24 V strip powered from a single end heats up more. Trimming to the required length removes the excess. The method for trimming a strip that is too long comes down to three steps: measure, cut at the lower mark, test before fixing.
Reconnecting two pieces after cutting
The connection is always made between two pads, never on a section of LEDs.
- Clamp connector: quick, sufficient on a low-power IP20 strip.
- Soldering: the most stable connection, to be preferred on sections that heat up.
- Terminal block: acceptable for a temporary fix, to be avoided under a cabinet where the slightest bad contact shows.
- Aluminium profile: spreads heat and hides the connection once the strip is clipped in.
When the supplied connector does not line up, you can connect without a connector with a little method and a fine soldering iron.
The current direction
A strip has an input and an output, marked by arrows or by the position of the pads. Powering it from the output turns the strip off without damaging it. For a long run, power both ends: the voltage drop is corrected and the colour stays even from start to finish.
Where will your LED strip live?
If you would rather start from a room plan than from a strip to be trimmed, take the time to describe your room to us: we will point you towards the light that creates the same effect, with no DIY involved.
Protecting the cut: sealing and warranty
A cut leaves the circuit exposed. In a dry room, the strip stays under its sheath and nothing moves. Under a worktop, in a bathroom or outdoors, the slightest drop reaches the copper. Closing the cut with an end cap or heat-shrink sleeve is the only reliable finish.
Closing a cut on an IP65 or IP67 strip
- IP20: no sealing, for dry areas only.
- IP65: protected against splashes, the cut requires a silicone end cap.
- IP67: withstands brief immersion, a heat-shrink sleeve is the expected finish.
- Finishing silicone: seals the opening, never the surface of the pads.
The move that voids the warranty
A cut off the mark is immediately visible on the circuit, and it is the first thing checked in the event of a claim. Cleaning the pads with a knife or alcohol also damages the copper tracks.
If cutting were to weaken the whole setup, a linear LED batten can be trimmed cleanly in the workshop, recessed mini spots light a worktop with no visible strip, and a ceiling light settles the question in one go. For a softer interior, choose a light suited to the size of the room, or ambient lighting designed in layers rather than as a continuous line.
In stock · shipping costs shown at checkout · up to 30% off in your cart


Ready to turn inspiration into reality?
Tell us about your room, your style and your budget, and we will show you the pieces that truly suit your project.
Get guidance in 30 seconds →