Recessed spotlight without clips: changing the bulb without breaking anything
This article is also available in French: Comment Changer ampoule spot encastrable sans clips
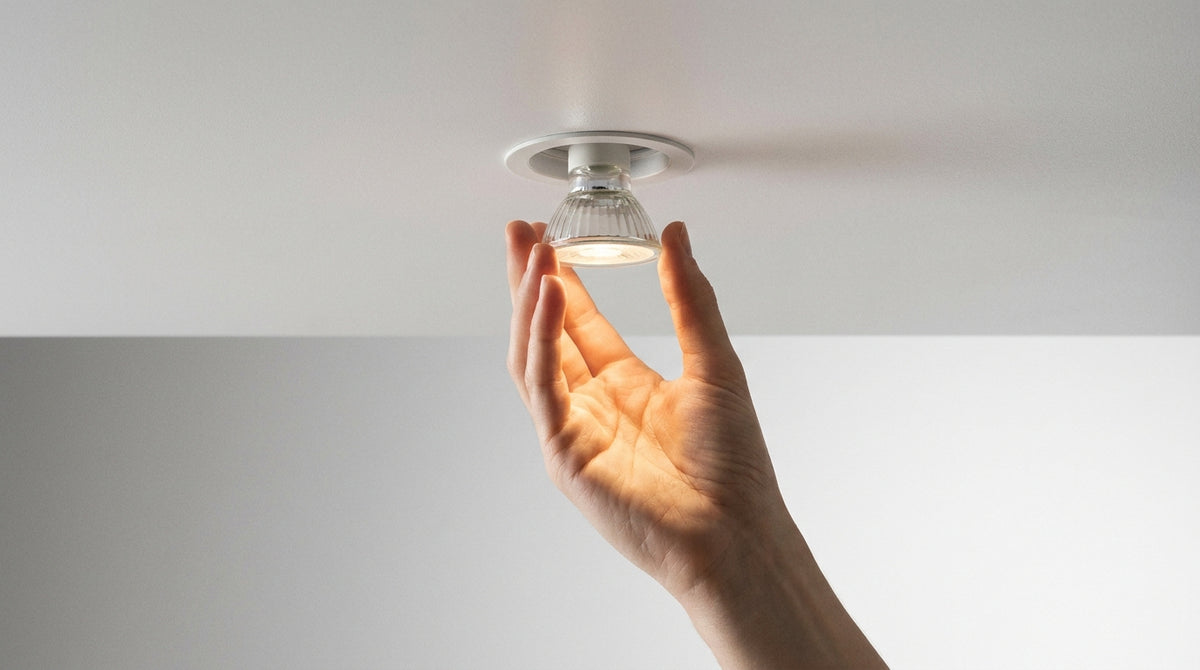
Switch off the power at the circuit breaker, not just at the switch. On a recessed spotlight without clips, the bulb comes out from below: a quarter turn to the left for a GU10 base, a straight pull for a pin base such as GU5.3 or G4. The trim and the housing stay in the ceiling: never pull on the rim.
How do you change the bulb of a recessed ceiling spotlight?
You switch off, identify how it is held, and lower the bulb without forcing the trim. A bulb that resists is almost never stuck: it is held by a spring that must be pinched before pulling. Replacing a single bulb requires no tools; realigning an entire ceiling is a matter of planning an lighting project.
Switch off the power at the circuit breaker, not just at the switch
A wall switch says nothing about the actual state of the wiring: if the neutral is cut instead of the live wire, the socket stays live. The circuit breaker, on the other hand, isolates the whole circuit, transformers and modules included.
- Consumer unit: switch off the lighting circuit for the room, then check by operating the switch
- Dimmer or remote control: some modules keep a residual voltage after switching off
- Halogen still hot: let it cool, hot glass marks when unscrewed
- Bulb broken in the socket: switch off, remove the shards, then grip the remaining base with flat pliers
These habits apply to every light point in the home, and the precautions for changing a bulb safely are the same for a wall light and a ceiling light.
Identify the type of fixing before pulling
Three mountings are found in suspended ceilings, and each requires its own move. Confusing them means tearing off a trim or breaking a glass.
- Side springs: two tabs press the housing against the plasterboard, they are pinched towards the centre
- Metal clips: the ring is held by two visible hooks, to be spread with a thin screwdriver
- Without clips: only the bulb protrudes from the ceiling, it comes out of its socket without the housing moving
Removal from below, when the spotlight is simply seated in the socket, is described step by step in the guide to changing the bulb of a recessed spotlight.
How do you remove a recessed LED spotlight?
You only remove the housing if the socket or the module is at fault. A dead bulb is replaced without touching it. Taking the unit out unnecessarily loosens the springs and leaves a cut-out that holds less well in the ceiling.
Spotlight without clips: side springs, socket and trim
When springs are involved, the housing comes down as one piece: slide two fingers under the rim, pinch, and let it come down gently. The cable often stays attached, which is enough to reach the socket.
- Pinch before pulling: never the other way round, otherwise the plasterboard crumbles
- Hold the housing: one hand underneath, the other pinches, to avoid dropping it on the tiles
- Note the wires: photograph the connection before disconnecting anything
The configuration varies from one model to another, and the guide to the spotlight without a ring describes each variant.
Spotlight without a ring: grip the bulb without marking the metal
A pin-base bulb is held by two pins and nothing else, and its glass is thin. The chrome ring, for its part, marks at the first misplaced contact.
- Suction cup: the accessory supplied with some spotlights avoids any contact with the glass
- Thin gloves: finger grease dulls the chrome and soils the socket
- Adhesive tape: a loop stuck to the back of the bulb gives grip when nothing protrudes
- Repainted trim: a craft knife blade around the rim releases the paint that acts as a suction cup
On a pin base, the voltage matters as much as the diameter: GU5 bulbs are only suitable for spotlights supplied at low voltage through a transformer.
What cannot be removed: the integrated LED
No glass to grip, no base to turn: the source is fixed to the module. Only the complete housing comes down, after pressing the springs. Recent recessed LED downlights are often replaced module by module, without touching the wiring.
How do you change the bulb of a recessed spotlight in a kitchen or bathroom?
In these two rooms, the environment is what blocks you: cooked-on grease on one side, condensation on the other. Clean the socket before refitting, keep the same base as the original bulb, and in wet areas choose a model protected against splashes.
Kitchen: grease sticking the bulb to the socket
Cooking vapours settle on the trim and set around the base. What should give way in a quarter turn becomes a stiff point, which must be worked without jerking.
- Cooked-on grease: a damp microfibre cloth around the rim, never liquid product in the socket
- Swollen assembly: switch off the spotlight, let it cool slightly before turning
- Tools: nothing metal on the glass, your hand is enough
- Near the extractor hood: heat speeds up soiling, regular cleaning prevents seizing
When several spotlights fail within a few months in the same room, the lighting is often undersized, and a better-placed kitchen fitting solves the issue more durably than repeated replacements.
Bathroom: IP44, steam and zones
Steam seeps in wherever the metal cools, and the trim ends up marked. A reinforced ingress protection rating, such as IP44 bulbs, withstands splashes without any change to the mounting.
The guide dedicated to the bathroom spotlight bulb details the models that hold up in a damp room and the mistakes that blacken a socket.
If the housing falls apart or the socket has blackened, replacing it individually no longer makes sense. A bathroom lighting project lets you start again with a consistent layout, rather than patching spotlight after spotlight.
Is it possible to change an integrated LED bulb?
No: the source is soldered or clipped into the module, it does not unscrew. What is replaced is the complete module, sometimes with its driver. On a spotlight with an integrated LED, no commercially available bulb will take its place.
Recognising an integrated LED
The doubt clears quickly once the unit is switched off and cooled.
- No base: no GU10 or visible pins in the socket
- Bonded diffuser: the cover does not unscrew, it is clipped or glazed
- No marking: no bulb reference printed around the glass
- Spotlight reference: it is engraved on the trim or on the housing, on the ceiling side
The subject is covered in detail in the guide devoted to the integrated LED bulb, particularly for models whose driver unplugs separately.
New module or new fitting: how to decide
Three questions are enough: is the module reference still available, do the other spotlights in the room light the same way, and will the ceiling take a new cut-out?
- Module available: a one-off replacement preserves the alignment and the original look
- Module not available: spotlights from the same family are changed together, otherwise the white tone differs from one point to another
- Damaged ceiling: a larger cut-out closes badly, it is better to change a recessed spotlight for a model of identical format
When the harmony of the ceiling matters more than the repair, replacing a spotlight with a pendant brings back a central point and softer light, without multiplying cut-outs.
Before ordering, a photo of the trim and the reference read on the housing are enough to talk to the Designix team and have the format confirmed.
Which base should you choose so you get it right next time?
The reference is on the bulb you removed, never on the original packaging. Read the reference printed on the glass or the base, note it down, and order the same one. An identical base saves you coming back to it in six months.
Reading GU10, GU5.3, G4, E27 on the old bulb
Each marking describes both the shape of the base and the type of supply. The table below summarises the four families found in a recessed spotlight.
| Base | Shape | Removal move | Supply |
|---|---|---|---|
| GU10 | Two thick pins | Quarter turn to the left | 230 V, without transformer |
| GU5.3 | Two thin pins | Straight pull | Low voltage, via transformer |
| G4 | Two very short pins | Straight pull, without tilting | Low voltage, small spotlights |
| E27 | Large screw thread | Standard unscrewing | 230 V, large spotlights and wall lights |
The most frequent confusion is between GU10 and GU5.3, because the two bulbs look alike. GU10 LED bulbs are recognisable by their thick pins, which require the quarter turn.
For the rest, a ruler is enough: pin spacing, diameter and base length are the three measurements that make the difference. The guide to bulb base sizes lists the equivalents.
Colour temperature: what changes in the room
The base determines compatibility, the colour temperature determines the atmosphere. A spotlight at 2700 K extends the warmth of a halogen and makes hard shadows disappear on a pale wall. A 3000 K keeps that softness with a slightly sharper rendering, useful above a worktop or a mirror.
The trap is not the value chosen, it is the mix: a new, cooler spotlight among five others is immediately visible on the ceiling. Check the full reference on the types of bulbs before confirming your basket.
Once the base is identified, the simplest thing is to order the exact replacement: the collection of recessed LED bulbs groups the GU10, GU5.3 and E27 bases found in a spotlight without clips.
Which recessed spotlight do you have in your ceiling?
On the same subject
In stock · shipping costs shown at checkout · up to 30% off in your cart


Ready to turn inspiration into reality?
Tell us about your room, your style and your budget, and we will show you the pieces that truly suit your project.
Get guidance in 30 seconds →