Trimless downlight: changing the bulb without breaking anything
This article is also available in French: Comment Changer ampoule spot sans cerclage
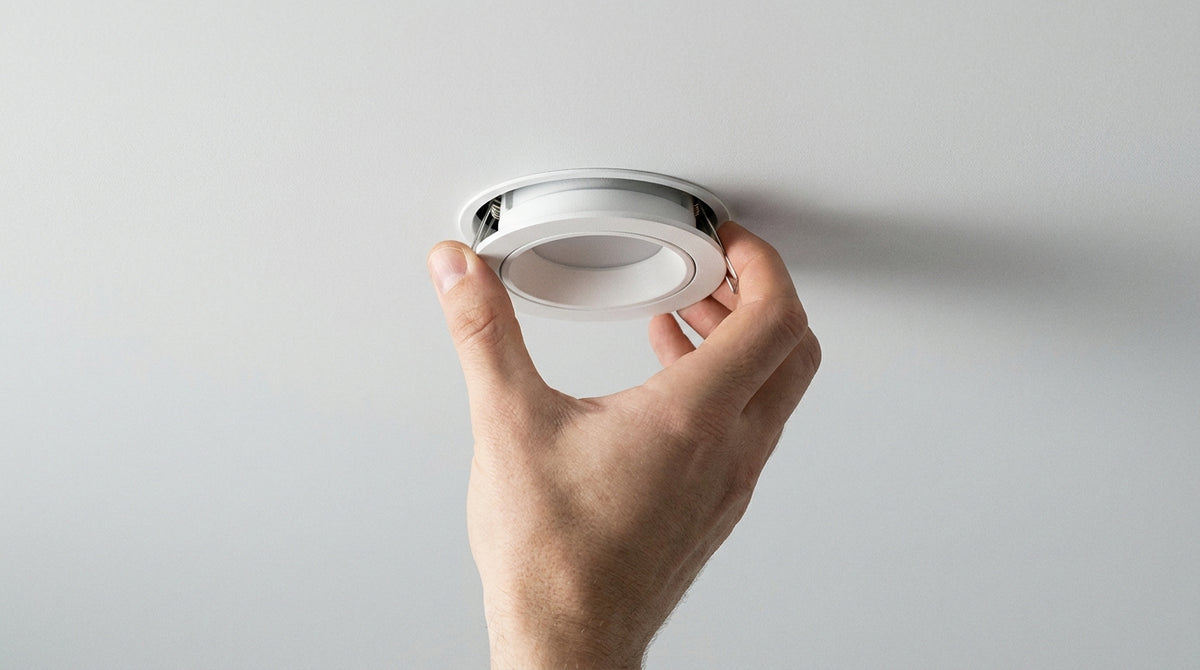
Place a finger on the edge of the bulb and push sideways: most trimless downlights are held by two springs. If the bulb turns a quarter turn against resistance, they are pins. If nothing moves after these two attempts, the LED is soldered to the module and the whole fixture must be replaced.
A recessed downlight is almost never dismantled from the front, as people assume when climbing on a step stool. The retention happens a few millimetres from the edge, and the method changes completely from one model to another. That diagnosis guides our lighting advice before we even talk about the bulb.
What holds a downlight bulb in place when there is no trim?
Three systems, and only one is visible. Side pressure on springs, a quarter turn on pins, and the soldered LED module that cannot be dismantled. A screwed trim also exists, but it announces its presence: on a trimless downlight, you have to look elsewhere.
| Retention | What gives it away | Action |
|---|---|---|
| Side-pressure springs | The bulb sinks on one side | Push, then let it come down |
| Pins and quarter turn | Resistance when rotating | Turn, then pull straight out |
| Soldered LED module | No play, no movement | Replace the module or the downlight |
How to change a trimless downlight bulb, step by step
- Switch off the breaker for the lighting circuit, not just the switch.
- Slide your palm under the downlight and press on the edge of the bulb, towards one side.
- If it comes down, grip it and free it without pulling on the wire.
- If it resists, turn it a quarter turn anticlockwise.
- Note the base before refitting: GU10, G9 or G4.
A directional downlight adds a movable ring that must be held with one hand while the other works. The full method, including springs that flip back, is described in our article on the recessed downlight without clips.
Screw bulb spinning freely: the locking point
A bulb that turns without coming free indicates either a bayonet base or a G9 socket whose contact spring has lost its tension. In the first case, press before turning. In the second, pull straight, without rotating.
The blockage rarely comes from the bulb. It comes from the socket, cracked or expanded by years of hot-cold cycling. Our guide to changing the bulb in a recessed downlight details these cases.
Once the retention is identified, the bulb remains to be chosen. The selection of design bulbs is sorted by base, which avoids ordering the wrong format.
Which bulbs are used for ceiling downlights?
Almost all ceiling downlights take a GU10, a G9 or a G4. The GU10 runs on 230 V and clips onto two pins. The G9 is a short pin base, also 230 V. The G4, at 12 V, is used in low-voltage downlights behind a transformer.
Base size: GU10, G4, G9, how to decide
Take out the bulb and read the base engraved on it, rather than measuring the socket blindly. In a survey of 33 references from the Ampoules Design collection on 5 October 2026, G9 accounts for 27 % and G4 for 24 %: short formats dominate in ceiling downlights.
A GU10 with pins will not fit a G9 socket, and the reverse is true. The clue that settles it in a second: two thin pins close together. Our guide to bulb base sizes lists the dimensions format by format.
In a flat recessed downlight, G9 remains the most common. G9 bulbs cover the usual wattages in warm white as well as neutral white.
In a directional downlight, GU10 has the advantage: it clips in and out without tools. GU10 LED bulbs meet that need, including dimmable versions.
2700 K or 3000 K, what each room requires
2700 K gives a warm light, close to filament, suited to the living room and bedroom. 3000 K, whiter, structures a kitchen or bathroom. These are the two temperatures that come up most often in ceiling downlights.
Two different temperatures in the same room are immediately visible. Our guide to types of bulbs details what each one changes in the result.
For a living room or bedroom, 2700 K remains the safe choice. 2700K bulbs exist in the most common bases, from GU10 to E27.
What holds the bulb in your downlight?
The bulbs that fit most downlights


How do you change the bulb in a sealed bathroom downlight?
The cover unscrews a quarter turn or unclips by gently pulling on the edge. The bulb is then removed as on a dry downlight: side pressure or quarter turn. The real difficulty lies elsewhere, in the gasket that must be put back straight before closing.
The gasket and the cover: the disassembly order
- Switch off the breaker for the lighting circuit.
- Unscrew the cover a quarter turn, or prise it with a fingernail on the edge of the glass.
- Remove the gasket, lay it flat and do not stretch it.
- Take out the bulb by side pressure, then let the retaining spring drop back.
- When refitting, put the gasket back in its groove before screwing the cover back on.
A badly refitted gasket lets moisture through, and the downlight loses its protection rating without anything being visible. The full procedure is described in our article on the bathroom downlight bulb.
IP44 or IP65: what the shower requires
The protection rating is read after IP: the first digit concerns solids, the second water. IP44 withstands splashes, IP65 resists jets. Near the shower or bath, IP65 is required; elsewhere in the room, IP44 is enough.
Worth knowing before ordering: in our survey of 33 references on 5 October 2026, the IP20 rating appears on 100 % of the listings. The sealing of a bathroom downlight therefore comes from the fixture, never from the bulb alone. The bathroom bulb collection groups the formats that accept this closed housing.
What is an integrated LED, and why can it not be replaced?
An integrated LED is soldered onto a board housed in the body of the downlight. No socket, no base, no bayonet: the source and the fixture form a single piece. When it weakens, the module or the complete downlight is replaced, never the bulb.
Disassembly starts at the surround: two blade springs release the whole unit, then a screwed board appears with its connector. Our article on the integrated LED bulb describes this disassembly and the cases where the driver remains housed in the ceiling.
Recognising a soldered module before buying
- No visible socket behind the diffuser, only a board.
- Fixed wattage: a downlight rated at 6 W or 8 W, not interchangeable.
- Single temperature: no choice between warm white and neutral white.
- Glued diffuser: the opal glass does not unscrew.
Repair or replace the fixture
Two paths open up: find the replacement module, or replace the fixture. In the same survey of 33 references on 5 October 2026, the 5-year warranty covers only 27 % of the listings, which weighs in the decision.
A model with a socket makes the next change trivial, provided you find the cut-out diameter: replacing a recessed LED downlight without that reference ends in plastering work.
When the cut-out is damaged or the ceiling too uneven, a led ceiling light covers the surface in one go.
The selection is also reviewed by buyers on our Google listing, verifiable in one click.
If you are hesitating between two bases before ordering, the doubt almost always comes from the socket and not the price. Photograph the housing and you can write to us with the photo, and we will decide together.
Should you cut the power to change a bulb?
Yes, and at the breaker, not the switch. A socket can remain live even with the switch off, depending on how it is wired. A trip to the consumer unit costs ten seconds, against a risk that cannot be undone.
The two-way switching trap
With two switches for the same line, one of the wires remains live whatever the position of the switches. This is the classic case of hallways and corridors, where downlights are often added to an existing circuit. Taking on an hallway and corridor lighting project at the same time avoids leaving a doubtful control point.
What remains live with the switch off
- The live wire, if it reaches the bottom of the socket rather than the switch.
- The transformer of 12 V downlights, powered upstream.
- Control modules: dimmer, sensor, sometimes remote control.
In stock · shipping costs shown at checkout · up to 30% off in your cart


Ready to turn inspiration into reality?
Tell us about your room, your style and your budget, and we will show you the pieces that truly suit your project.
Get guidance in 30 seconds →