How to change a recessed spotlight bulb: the safe method
This article is also available in French: Changer ampoule spot encastrable
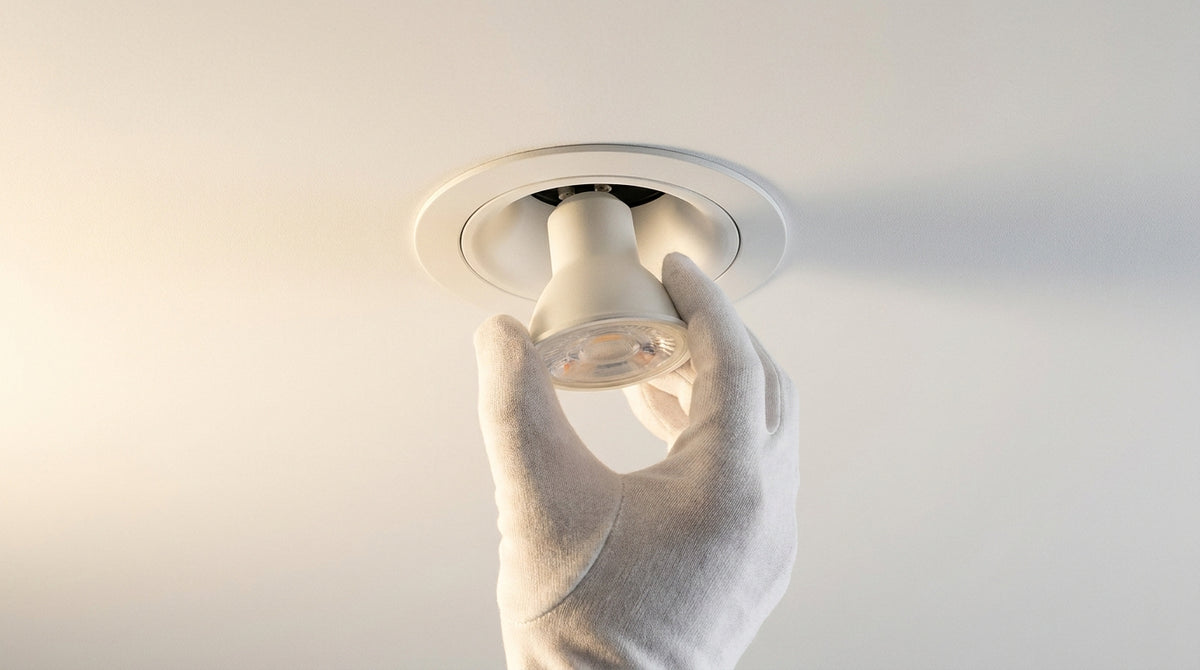
Switch off the breaker, let it cool, then identify the base before pulling: a GU10 twists out a quarter turn, a GX53 unplugs, an integrated LED module cannot be replaced. Forcing the wrong model damages the socket or the ceiling.
How do I change the bulb of a recessed ceiling spotlight?
Switch off the power at the breaker, wait for it to cool, then remove the trim ring by pinching its two tabs. The bulb is now accessible: a quarter turn for a bayonet base, a straight pull for pins. Two minutes are enough, provided you do not force a sealed model.
The method depends on the model, not the room. A recessed spotlight with a socket comes apart without tools, a sealed model is removed with its driver. In a survey of 179 references from our collection as of 30 September 2026, 42% carry the GU10 mention and 51% the LED mention, with the base stated on 176 listings.
How do you identify the base before pulling?
Look at the bulb without touching it. Two thick pins topped by a central bulge indicate a GU10, two thin pins a 12 V GU5.3, a flat wide ring a GX53. No visible bulb means the spotlight is a sealed LED module.
- GU10: 230 V, quarter-turn fitting, replaceable without tools
- GU5.3: 12 V, transformer upstream, fragile pins
- GX53: flat ring, unplugs with a straight pull
- LED module: diodes embedded in the body, replace the spotlight
Any doubt about the diameter or socket type is settled by looking at the base marking. Our guide to bulb base sizes covers each format.
Changing the bulb of a tiltable recessed spotlight
A tiltable spotlight tilts before it opens. Angle the collar downwards, the clip appears, then release the socket. This movement avoids pulling on the swivel joint and knocking the axis out of alignment.
These models direct light onto a wall or a worktop. A tiltable spotlight refitted badly lights the floor instead of the wall: reposition the axis before clipping, not after.
A spotlight whose listing states a base is repaired by changing the bulb, a spotlight with sealed diodes is replaced whole. The distinction appears on every listing of our LED spotlights.
How do you change a recessed spotlight bulb without clips?
Look for the retaining ring rather than clips: it unscrews a quarter turn. If the spotlight is held by two springs, press on them and pull downwards. With neither clips nor springs, the ring comes off with a thin hook slipped between the plaster and the collar.
How does a recessed spotlight without springs come apart?
Through the ring. There are three families: the screwed ring, the bayonet trim and the push-fit collar. Look for the slot around the edge, it shows the direction of rotation. Cases of spotlights held by the socket alone are detailed in our article on the recessed spotlight without clips.
What if the spotlight is stuck to the ceiling after painting?
Run a craft knife blade along the paint seam, all the way round, before pulling. The paint film holds the collar and tears off the plaster. Ten seconds with a blade save a plastering repair.
If the spotlight still resists, send a photo to a Designix adviser: checking the base takes two minutes and avoids an unnecessary order.
GU10, integrated LED, GX53: what to do for your model?
Three cases, three answers. The GU10 unscrews and is replaced alone, the GX53 unplugs and is replaced alone, the integrated LED module is not replaceable. In the first two cases, ten minutes are enough. In the third, the whole spotlight is removed.
| Model | Method | What gets replaced |
|---|---|---|
| GU10 | Quarter turn to the left | The bulb alone |
| GX53 | Straight pull on the ring | The bulb alone |
| Sealed LED module | Removal of the whole spotlight | The fixture |
How do you replace a GU10 recessed spotlight?
Press lightly on the bulb to release it from the notch, then turn a quarter turn to the left. Fit the new one the same way, without over-tightening. The old one carries its colour temperature and wattage, two values to match to keep a room consistent.
An 8 W bulb replaces a 50 W halogen, and 2700 K stays consistent with a ceiling already fitted. Our article on replacing a GU10 recessed spotlight details dimmer compatibility.
The range of GU10 LED bulbs covers warm white to cool white, with a narrow or wide beam depending on ceiling height.
Is it possible to change an integrated LED bulb?
No. An integrated module is sealed into the spotlight body: diodes soldered to a board, driver embedded. No base appears when the trim ring is removed. In our survey of 179 references as of 30 September 2026, 98% show a 5-year warranty, and that is what takes over on these models.
Recessed spotlights: bulb or integrated LED


Bathroom, kitchen, outdoors: what precautions for each room?
The room dictates the protection rating, never the method. A bathroom spotlight rated IP44 or IP65 comes apart like the others, but its seal must go back exactly as it was. In the kitchen, grease bakes onto the collar. Outdoors, switch off the dedicated circuit first.
How do you change the bulb of a bathroom recessed spotlight?
Check the rating before unscrewing: IP44 withstands splashed water outside zones 0 and 1, IP65 resists jets. In the survey of 179 references as of 30 September 2026, 77% show IP20, 15% IP65 and 8% IP44: the choice of model is decided there, not on the bulb.
The collar seal goes back without pinching it. Badly repositioned, it lets moisture in and the bulb oxidises within a few weeks. For a damp room, a bathroom spotlight rated IP44 or IP65 settles the question from the start.
Our article on changing the bulb of a bathroom spotlight revisits seals and corroded sockets.
What does a kitchen recessed spotlight require in addition?
IP44 minimum above the cooking zone, IP20 is enough elsewhere in the room. Clean the ring when removing it, never the bulb. In the survey, 2% of listings state the kitchen as the room against 99% for recessed mounting across all uses.
Which spotlight is installed above you?
When should you replace the whole spotlight rather than the bulb?
When the module is sealed, when the socket is burnt out, or when the light flickers without the bulb being at fault. Replacing the bulb will fix nothing if the base is blackened or the driver is failing. In these three cases, the complete spotlight is removed as it was fitted.
This decision is made before buying: the markers of a coherent project are gathered in our advice for installing recessed spotlights in your living room. A tired spotlight is replaced in the same format by a more efficient model.
How do you know if the socket is dead?
Three signs: a black spot on the base, a slack contact spring, a burning smell when removing it. If the new bulb still does not light, the fault is on the socket side. Replacement then comes down to a designer light fixture in an identical format or a broader solution: measure the cut-out with a ruler before choosing.
Does the warranty cover the bulb or the spotlight?
The spotlight, not the bulb. In a survey of 179 references as of 30 September 2026, 98% show a 5-year warranty. A sealed module that fails is therefore covered on the complete fixture, never on the wear part. To judge for yourself, the Designix Google listing is public and its reviews update as projects come in.
When the idea of starting over wins out, a LED ceiling light lights the whole room from a single source, with no row of spotlights to redo.
In stock · shipping costs shown at checkout · up to 30% off in your cart


Ready to turn inspiration into reality?
Tell us about your room, your style and your budget, and we will show you the pieces that truly suit your project.
Get guidance in 30 seconds →