Installing a light fixture on a DCL box: the installation explained
This article is also available in French: Installer luminaire plafond dcl
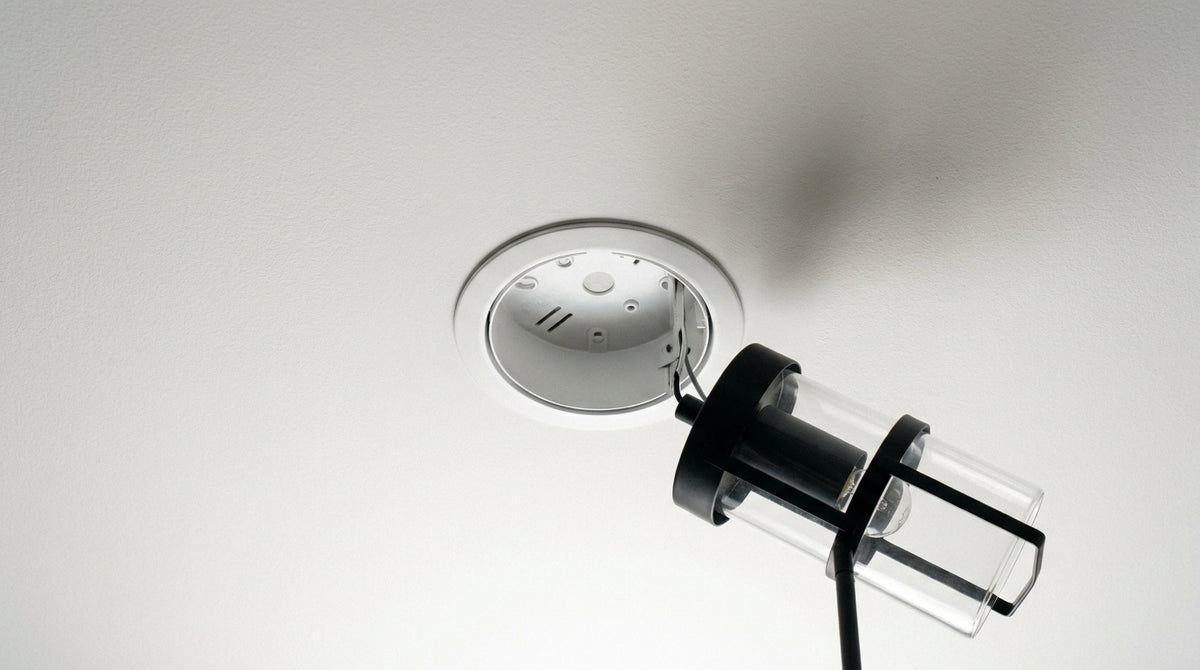
Switch off the lighting circuit breaker, remove the temporary socket from the box, then screw the fixture's mounting plate into the two screw holes before clipping on the connector. A ceiling light only needs these two screws; a multi-kilogram pendant does not: it is the hook, anchored in the slab, that carries the load.
How do you wire a DCL box for a light fixture?
The box contains three conductors already waiting: neutral, live and earth. You switch off the power, unscrew the cover, remove the temporary socket, then clip the fixture's connector onto the box's socket. The connection is therefore made on the fixture side, never in the wall.
What the box contains: neutral, live, earth
Three wires arrive behind the cover, and they do not all serve the same purpose.
- Neutral, blue wire, terminal N: it closes the circuit.
- Live, brown or red wire, terminal L: it supplies the fixture.
- Earth, green and yellow wire: it only comes into play on a class I fixture.
- Box socket: this is where the fixture's connector clips on, without tools.
A ceiling connection is prepared before buying the fixture, not only on the day of installation. In a room being fully redone, the light point is decided along with everything else: on a living room renovation project, the box's position is settled before the finishing touches.
Temporary socket or DCL connector: what you remove
A temporary socket is a terminal block on a leg, fitted to light the building site. It cannot hold a decorative fixture. You take it apart by noting each wire before freeing them, which saves you looking for the live wire once the sheaths are open. The method for cleanly removing the existing unit is described in this guide for removing a ceiling light without pulling out the conductors.
How do you fix a DCL box to the ceiling?
The box is screwed onto an existing flush mounting box, or surface-mounted when no box is provided. Two screws go through the oblong holes, you tighten moderately, you check with a level, then you close the cover. A box that is straight means a fixture that does not lean.
Surface-mounted or flush-mounted box
| Criterion | Surface-mounted | Flush-mounted |
|---|---|---|
| Ceiling | Solid concrete, slab, old ceiling | Plasterboard with box already in place |
| Lost height | A few centimetres below the ceiling | Flush, invisible |
| Work | Drilling and wall plugs | Reusing the existing hole |
The rest does not change: the fixture's mounting plate covers the box, or leaves it visible when it is designed to. The installation reference points are detailed here for installing a ceiling light.
Levelling the box
A gap of a few millimetres shows on a long pendant, never on a flat ceiling light.
- Check with a spirit level before tightening the second screw.
- Tighten alternately, half a turn per screw, so as not to distort the mounting plate.
- Use the oblong hole to compensate for screw holes that are too far apart.
- Check the wire's play before closing the cover.
What are the different types of ceiling light fixing?
Three families, and weight is what decides. Screws in the box's two screw holes for a light ceiling light, a hook or eye bolt for a pendant, and no-drill systems for ceilings you do not want to touch. Aesthetics do not decide here.
| Fixing | For which fixture | Point to watch |
|---|---|---|
| Screws in the screw holes | Flat, light ceiling light | Box screw spacing |
| Hook or eye bolt | Pendant, chandelier | Anchoring in the slab |
| No drilling | Small fixture, fragile ceiling | Smooth surface, low load |
Screws in the box's screw holes
The box's two screw holes are spaced to a standard, which allows the ceiling light's mounting plate to be screwed on directly. On a survey of 157 references from our bathroom lighting collection as of 30 September 2026, 48% are wall-mounted, 24% surface-mounted and 11% suspended: the majority are therefore installed against a surface, not at the end of a wire. This is the case for the models gathered in the LED ceiling light selection, whose mounting plate sits flat on the box.
Hook or eye bolt for a pendant
A pendant works in pull-out, not in bearing. The hook carries this load, anchored in the slab or in the support provided for that purpose, and the box then only serves for the electrical connection. The same procedure applies to installing a chandelier on a DCL box.
No-drill fixing: how far it holds
High-strength clips and adhesives are suitable for light fixtures and for smooth, painted, clean surfaces. They hold the mounting plate, not the load: a wide shade or a thin glass fixture will eventually detach a support that was never intended for it. The method and its limits are detailed here for fixing a light fixture without drilling.
How do you wire a 2-wire ceiling light?
Two wires coming in, two terminals to fill: blue on N, brown or red on L. The box keeps the earth aside if the fixture is class II. You tighten, you pull gently on each conductor to check, then you close the connector.
Blue wire, brown wire: the correspondence
- Blue: neutral, terminal N.
- Brown or red: live, terminal L.
- Green and yellow: earth, to be connected only on a class I fixture.
When more than two conductors come out of the ceiling, identifying them calls for a different method: the case of 2, 3 or 4 wires at the ceiling is covered step by step.
Earth when the fixture is class II
A class II fixture is double-insulated: it has no earth terminal, and the box's green and yellow wire stays waiting, folded neatly under the cover. Leaving it free is not a problem as long as it does not touch any accessible metal part. A class I fixture, on the other hand, requires the earth: it is written on the product sheet label, and it is the first point to check before buying.
Installing a ceiling light without a DCL box: what is done
On a new build, the light point often already comes fitted with a connection box, and installation is done by connector. In renovation, nothing forces you to add one: a connection on clean terminals, protected inside a box, remains the solution when the existing wiring is sound. The point not to miss remains identifying the wires before separating them.
Which light fixture should you choose for a DCL box?
A fixture whose mounting plate screws into the box's two screw holes, or whose connector clips onto the socket without forcing. Weight, protection rating and base decide the rest. Light ceiling light for a hallway, pendant for the dining room, waterproof fixture near the shower.
Weight and balance: what the ceiling accepts
A flat ceiling light rests its mass on the box, which distributes the load over the two screws. A pendant moves everything to the end of a wire, and the anchoring point then works in pull-out. The wider and lower the fixture, the more the anchoring matters. Models designed to hang low, such as pendants, require a checked support before installation, especially on an old ceiling.
If the fixing seems too heavy to handle alone, describe the room and the fixture you have in mind: ask the team, and we will answer before you drill.
Ceiling lights and pendants that install on a DCL box
 Modern Bathroom Globe Wall Light | Luminance
 Oval Tube Bathroom Wall Light | Fiye
 ZAMBELIS Bathroom Wall Light 20W CCT IP44 DESIGN Sand White 25457
 Dimmable bathroom wall light | Qilo
 Round bathroom adjustable spotlight | Lisio
 Black bathroom wall light | Calix
See the whole selection: Bathroom Lighting, Ceiling, Wall or Mirror Lighting
Wet rooms: IP20 or IP44
The protection rating says what the fixture withstands: IP20 in a dry room, IP44 as soon as there are water splashes. On a survey of 157 references from our bathroom lighting collection as of 30 September 2026, 85% are IP20 and 10% are IP44. This collection has 2661 references as of 30 September 2026: waterproof models exist, they are simply not the majority. Near a shower, therefore, look directly for a bathroom light with IP44.
Ceiling light, pendant, chandelier: the right choice per room
- Dining room: a dining room chandelier above the table, at eye level once seated.
- Kitchen: a kitchen pendant over the island or worktop, never in the passage.
- Bedroom: a flat bedroom light on the ceiling, complemented by a wall light for reading.
- Hallway and entrance: a flat ceiling light, even light, no wire hanging down.
Which light fixture should your DCL box receive?
Related reading
In stock · shipping costs shown at checkout · up to 30% off in your cart


Ready to turn inspiration into reality?
Tell us about your room, your style and your budget, and we will show you the pieces that truly suit your project.
Get guidance in 30 seconds →