Solar LED strip lights for outdoor use
This selection is also available in our French store: Rubans LED d exterieur solaires
No products in this selection.
- Tracked delivery to your country Tracked delivery
- Secure payment at checkout Multiple payment methods
- 14 days to change your mind 14-day returns
- Secure payment Secure payment
Not sure of your style? Find it in 30 seconds
A few questions, and we will show you the pieces made for you.
Frequently asked questions
How do I choose the right product?
What are the delivery times?
Can I return an item?
Can I pay in instalments?
An interior that reflects who you are
Carefully selected pieces, shipped from our warehouses. Our team advises you before you buy, so you choose with confidence.
- Tracked delivery
- Pay in instalments, where available
- 14 days to change your mind
- Advice & showroom in Lyon, France
Start by measuring the actual run, including returns and corners, then choose the protection rating according to how exposed the area is: this order avoids rework. Solar outdoor LED strip lights illuminate without cable or socket, provided you place the panel in sunlight and choose a white suited to the evening mood.
What light does a solar outdoor LED strip give?
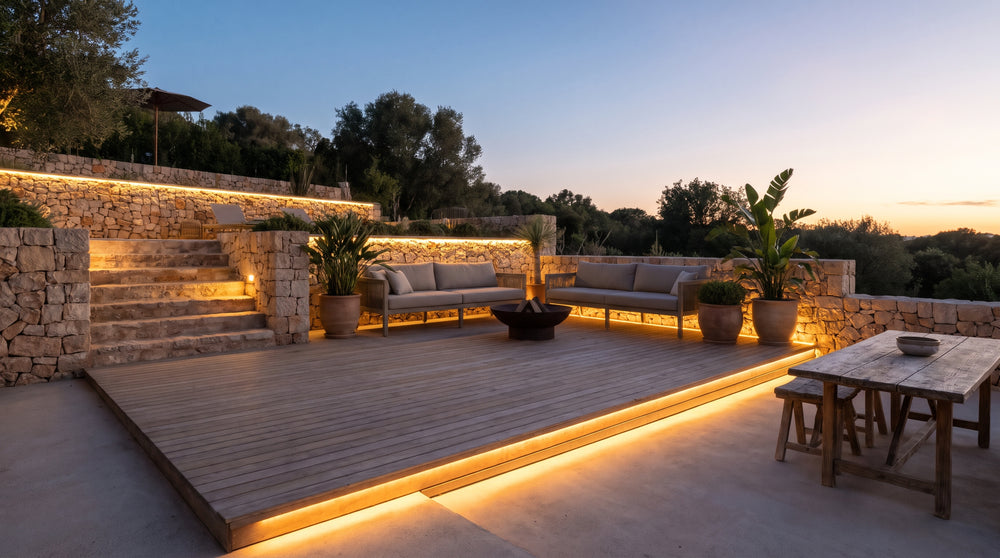
Solar outdoor LED strip lights give a grazing, indirect light: placed under an awning or along a low wall, they highlight the material rather than lighting a work area. The choice of white, from very warm to neutral, sets the mood, and runtime depends on sunshine and the mode used.
Warm white or neutral white: which mood for the evening?
A very warm white, around 2700 K, flatters stone, wood and gravel, and gives a terrace that invites you to stay. A warm white of 3000 K stays close, with a slightly more legible line. A neutral white, around 4000 K, is used when you need to move around, tidy up or eat outside. The useful rule: one single white family per area, otherwise the result becomes patchy. The very warm 2700 K lights and the 3000 K references cover these two most requested moods.
Solar panel and battery: what does runtime depend on?
Runtime is not a fixed value: it follows the season's sunshine, the panel's orientation, the cleanliness of its surface and the mode chosen. A panel in shade for part of the day recharges less, a cold battery delivers less, an animated mode uses more than a simple switch-on. Remember the principle rather than a figure: the more sun the panel sees, the longer the evening lasts. The rest of the range can be found in the entire lighting range.
Where to install a solar LED strip outdoors?
The best locations are those where the strip lights without being seen: under a pergola, along the top of a low wall, on a step edge, along a base course or around a pond. Each area dictates its protection rating and its fixing method.
| Location | Desired effect | Decisive criterion | Watch point |
|---|---|---|---|
| Pergola, awning | Indirect light above the table | Fixing at the beam head and suitable protection | The panel must stay in sunlight |
| Low wall, step, path | Discreet marking that does not dazzle | Slim strip, warm white, fitted on the step edge | Wear on the leading edge of the support |
| Facade, base course | Highlight the material and depth | IP65 minimum, length measured with returns | Shadow cast on the panel |
| Pond surroundings | Reflection on the water | Immersion rating and fixing outside the bathing area | No immersion without IP68 |
Under a pergola or awning: indirect lighting without a socket
Fixed at the beam head, the strip sends its light upwards or towards the structure, and the table stays in a soft glow. There is a double constraint: the strip must be protected from slanting rain, and the solar panel must stay clear of foliage. Waterproof LED strips meet the first, the layout meets the second.
Low wall, step and path: marking without running cable
On a step edge or along the top of a low wall, the goal changes: you need to see the relief without being dazzled. A slim strip, in warm white, placed on the side opposite the view, draws a clean line. On a path edge, adhesive alone does not last long, an aluminium profile or mechanical clips hold better. Water surroundings require an immersion rating, to be checked in pond and pool lighting.
Which IP protection rating to choose for an outdoor LED strip?
Choose the rating according to actual exposure: IP44 for a covered area, IP65 as soon as rain or spray touches the strip, IP67 for occasional immersion and IP68 if the strip stays in water. The rating describes the protection of the casing, not the quality of the light.
| Rating | What the rating guarantees | Suitable locations | To avoid |
|---|---|---|---|
| IP44 | Protected against water splashes | Under an awning, a covered pergola, a loggia | Direct rain and water spray |
| IP65 | Protected against water jets | Facade, low wall, open terrace, path | Immersion and high-pressure cleaning |
| IP67 | Resists temporary immersion | Pond edge, occasionally wet area | Permanent stay under water |
| IP68 | Designed for prolonged immersion | Fountain, pond, swimming pond | Fixing not intended by the manufacturer |
IP65, IP67, IP68: what the figure really allows
The first digit concerns solids, the second water. An IP65 withstands jets, not staying in water. An IP67 withstands a passage under water, not a year immersed. IP68 is the only one intended to stay in water, and even then, under the conditions the manufacturer describes. Reading these two digits avoids ordering a strip unsuited to the area.
Waterproof does not mean immersible
A strip described as waterproof resists humidity, splashes and rain, which is enough on a facade or a low wall. Placing it in a pond without an immersion rating leads to a quick failure, and sometimes to a complete redo. In a damp area without contact with water, a range designed for humidity remains the right compromise.
How to choose the length and voltage of a solar LED strip?
Length is measured with returns and corners, not by the linear metre of wall, and voltage decides the possible length: 24 V holds a longer line than 12 V without visible loss at the end. LED density sets the fineness of the light line and the power available per metre.
12 V, 24 V or 220 V: which voltage for which length?
12 V suits short lines and is easy to cut, with a noticeable light drop at the end of the line if you extend it. 24 V is the usual voltage for long lines in one piece, to be found in the 24 V models. 220 V removes the transformer but imposes rarer cutting marks: see the 220 V mains strips.
LED density: reading the data sheet without getting it wrong
The closer the LEDs, the more continuous the line appears and the higher the power per metre climbs. A low-density strip gives a string of dots, which can suit marking and much less a mood line. If one value on the data sheet contradicts another (a tiny stated flux with high power, for example), keep the power and ignore the flux.
Cuttable LED strip: how does it work?
A cuttable strip is cut only at the marks printed on the circuit, never between two. Each section remains usable if it is re-powered from its intended end. Cutting elsewhere interrupts the circuit and the part after the cut no longer lights up.
Locate the cutting mark before cutting
The cutting pitch depends on the model and the voltage: two strips are not cut in the same place. Locate the lines and the connection pads, measure twice, cut cleanly with a clean tool. A strip cut outside the mark cannot be repaired, and the lost portion cannot be recovered.
What to do with the remaining section?
A correctly cut section remains a complete strip: it is re-powered from its end and can equip a second low wall or the underside of a staircase. Plan the connector matching the model before cutting, otherwise the section remains unused. The rest of the catalogue can be browsed in the LED strip collection.
Which solar LED strip for which outdoor use?
The choice depends on what the area should deliver: indirect light above a terrace table, discreet marking along a step, or a reflection on water. Exposure decides the protection rating, the length of the run decides the voltage, and the white decides the mood.
Covered terrace or open garden: two different constraints
Under a covered terrace, the strip is protected from rain but the solar panel must extend beyond the roof to capture. In an open garden, the opposite: the panel finds the sun easily, and it is the strip that must withstand the rain. Two fixing logics, then, for the same lighting gesture.
Pond edge: caution before effect
The reflection on water is one of the most beautiful effects of a strip, and the riskiest to install. You need a real immersion rating, a fixing outside the bathing area and a solar power supply placed away from splashes. If the data sheet does not give the rating, choose another location. The RGB multicolour strips and the RGBW versions with adjustable white also open up colour play.
How to install and maintain a solar LED strip?
Place the strip on a clean, dry surface, in a profile or on a support that holds it, then orient the solar panel towards the sun's path, without cast shadow. Cleaning the panel and the strip with clear water twice a year is enough to preserve the effect.
Fix the strip so it lasts several summers
The original adhesive holds on a flat, degreased and dry surface, but gives way on irregular stone and under temperature variations. An aluminium profile or mechanical clips take over the work, protect the circuit and make access to the connector easier. Test the switch-on before permanently locking the position.
Keep the solar panel clean and well oriented
A dusty panel, shaded by a branch or dirtied by spray recharges less, and the evening shortens. A wipe with clear water, without product, and a check of the orientation at the change of season make up the essentials. Think about storing the battery if the cold damages it. The complete guide is in the Designix lighting catalogue, with secure payment, tracked delivery, returns and attentive customer service.
Which mistakes to avoid before buying a solar LED strip?
The costliest mistakes: measuring your wall without counting returns, confusing mood lighting with functional lighting, placing an unprotected strip in a rain area, and fixing the solar panel in shade. Checking the protection rating and the support before ordering avoids rework.
- Survey the run on site, returns and corners included, rather than estimating by eye.
- Expect mood light from a solar strip, not the lighting of a work area.
- Choose the IP rating according to actual exposure and not according to the product's looks.
- Plan the support or profile from the order, without relying on adhesive alone.
- Locate the panel's position before fixing the strip, not after.
To compare the families before deciding, browse all the home's LED strips.
Frequently asked questions about solar LED strips
Can a solar LED strip be left outside all year round?
It depends on its protection rating and the season: a strip intended for outdoor use withstands rain and moderate frost, but a very cold battery loses capacity. In spray or snow areas, check the fixings and the condition of the panel in spring.
Why does my solar LED strip light less in winter?
In winter, the day is shorter and the panel captures less energy, while the battery handles cold poorly. A dirty or partly shaded panel makes it worse. Clean the panel, check its orientation and use the most economical mode.
Can a solar LED strip replace an LED ceiling light on a covered terrace?
No, the two do not do the same job: an LED ceiling light lights an area for moving around or eating, a solar strip highlights a surface and creates a mood. On a covered terrace, the strip complements functional lighting, it does not replace it.
How many metres of LED strip should be planned for a terrace?
Measure the actual run, returns and corners included, then add the reserve needed for connectors and fixing passages. Better to survey the perimeter on site than to estimate by eye: it is the difference between the wall and the run that forces a reorder.
Which white temperature to choose for outdoors?
A very warm white relaxes a terrace in the evening and flatters stone and wood. A more neutral white stays legible for moving around, tidying up or eating outside. The essential is to keep a single white family in the same area to avoid a patchy result.