Outdoor floodlight with motion sensor: choosing the right range
This article is also available in French: Projecteur extérieur avec détecteur de mouvement longue distance
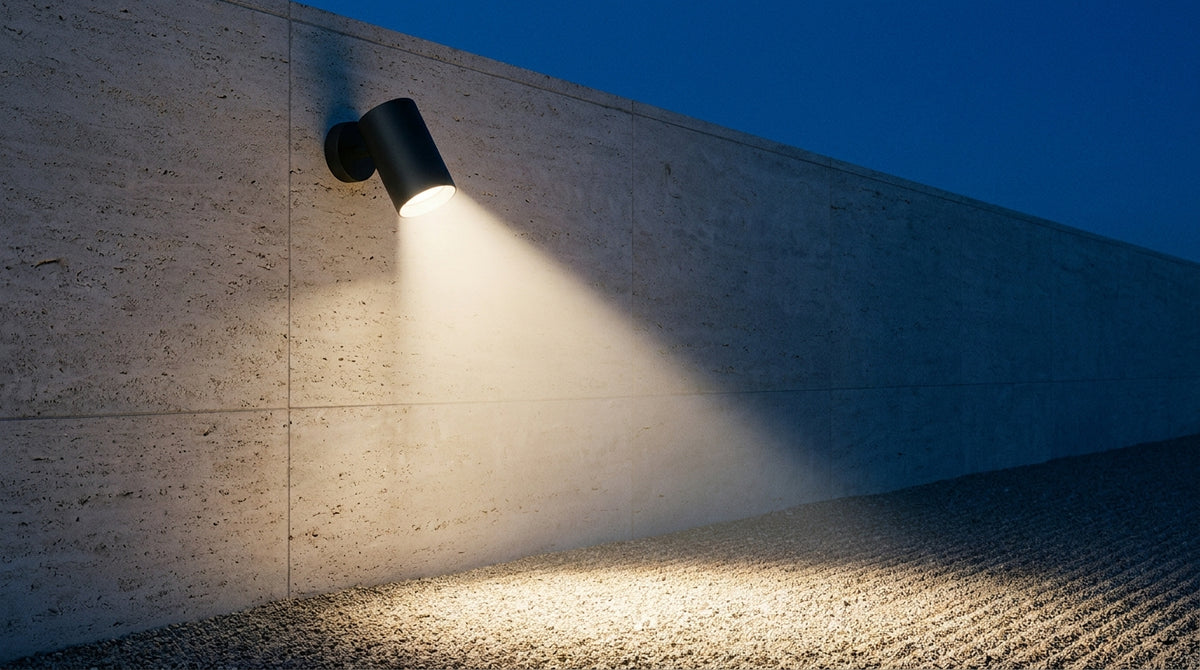
Point the beam downward, set the range to the area you actually use, then walk the trigger zone at night to check it. A long-range outdoor floodlight with motion sensor does not cover 20 metres because the box says so, but because the sensor and the beam aim at the same spot.
What is the detection distance of a motion sensor?
Allow 8 to 12 metres for a standard infrared sensor, more on models advertised as long range. That figure is measured on the sensor axis, in cool weather, on a figure crossing the field. Change the mounting height or the angle, and the usable range shifts.
Advertised range versus usable range: what changes
The datasheet gives a maximum range, obtained on axis, with a clear crossing. Your driveway, however, is walked at an angle, sometimes in a light T-shirt on a warm night. The sensor compares the heat of the scene with that of the background: when the two are similar, it sees less well.
- The axis: a crossing at right angles triggers better than one coming straight at the sensor
- The distance: allow half the advertised range for reliable triggering
- The heat: summer nights and exposed walls reduce contrast
Our outdoor floodlight with motion sensor collection has 173 references as of 1 October 2026, and each product page shows both its advertised range and its angle.
To understand missed triggers, our guide on choosing outdoor lighting with a sensor covers the mounting cases.
Detection angle and sensor orientation
A wide sensor sweeps 180 degrees: handy for a corner, less so for a driveway running along the public road. A narrower model, 90 to 120 degrees, is set to the strip of ground you actually walk.
- The sweep: aim at the actual route, not the whole plot
- The pivot: aim the housing, then the sensor, separately when possible
- The mask: a side shield cuts detection towards the street
How do you choose an outdoor floodlight?
Choose the surface to light first, the range next, the power last. A 20 W LED floodlight well placed lights better than a 50 W one aimed badly. Finally check the IP rating, the housing material and the sensor settings.
How many lumens do you need to light an outdoor area?
Allow about one hundred lumens per m² to move around without hunting for your keys, double that for an entrance or a dining corner. Too much output on a light wall tires the eye and washes out the facade.
- 1,000 to 1,500 lm: short driveway, threshold, small terrace
- 2,000 to 3,000 lm: entrance, courtyard, evening table
- Beyond that: large surfaces, best kept for dimmable models
The full calculation is set out in how many lumens to light a terrace or garden.
Which LED power for outdoors?
Between 15 and 30 W covers the entrance or driveway of a house in LED. Power alone tells you nothing: at equal output, everything depends on the efficiency of the source and the quality of the heatsink.
Our guide on which LED power for outdoors helps you settle the calculation before comparing models. You can also browse our outdoor lighting directly once the surface is measured.
Outdoor floodlights with motion sensor


At what height should a floodlight be mounted and which way should it point?
Mount it between 2.50 and 3 metres, under the gutter or on a gable, and tilt the beam towards the ground, never towards the horizon. Higher up, the sensor sweeps too wide and the halo lands on the neighbour. Lower down, people walking past escape it.
Coverage zone: check it on foot, at night
Walk the whole route with the floodlight on, at dusk, along the path people actually take. Measure the distance between the facade and the furthest point to cover: that figure sets the range to dial in.
- The gate: light before it opens, not after
- The route: the light should come before the step
- The steps: a hard shadow on a step costs you a fall
On a wall rather than the ground, a wall light gives continuous light with no floodlight effect: our outdoor wall lamp works as a complement.
Which outdoor zone should light up first?
Hold time, sensitivity, night mode: the three settings
The hold time is set to the crossing time, often one to three minutes. Sensitivity is set to minimum, then raised one notch until triggering is reliable. Night mode blocks switching in full daylight and acts as standby on dusk-to-dawn models.
- Hold time: long enough not to finish in the dark
- Sensitivity: as low as possible, even if you have to go up a notch
- Night mode: always on outdoors
For installation, installing your own outdoor lighting sets out the order of steps, including switching off the circuit.
If you are still hesitating between two orientations or two models, describe your facade and the zone to cover on our contact page: we answer on the choice, not on the datasheet.
Which IP rating and material should you choose for outdoors?
Aim for IP65 for a floodlight exposed to rain, IP44 under a canopy, IP20 only indoors. On materials, aluminium and powder-coated metal last for years outside, plastic is best kept for sheltered spots. The stated warranty, 3 years or 2 years, tells you the rest.
IP65 or IP20: what goes where
| Location | Rating | What it covers |
|---|---|---|
| Under a canopy, high up | IP44 | Splashes, no direct jet |
| Gable, mast, seaside | IP65 | Driving rain and dust |
| Garage, utility room | IP20 | No water spray |
The first digit matters as much as the second: IP65 protects against jets, not against immersion. Our article on the LED floodlight with sensor details these protections on sealed housings.
Aluminium, plastic, metal: what ages outdoors
- Aluminium: natural heatsink, keeps its colour, a little heavier
- Powder-coated metal: durable matt finish, watch the edges
- Plastic: light, best kept for covered areas
- Seals and screws: stainless steel, or rust wins before the LED does
A housing whose source can be replaced with an E27 base is repaired rather than thrown away. Black, grey or brown finishes age more discreetly than a glossy white facing due south, and contemporary, industrial or vintage styles are chosen to suit the facade.
Solar or mains-powered floodlight for long distance?
Mains holds the range, solar holds the autonomy. A battery recharges less in winter, just when you need more light. For a fifteen-metre driveway and reliable switching all year, mains power remains the reference.
- Mains: constant output, powerful sensor, cable to plan for
- Solar: free placement, limited reserve in December and January
- Hybrid: solar on standby, mains as backup
LED floodlights with motion sensor cover these configurations. Lighting a facade or a shop changes scale: see our article on lighting a facade.
How do you light without dazzling the neighbours?
Tilt the beam towards the ground and cut any halo above the horizon. A floodlight aimed at the street dazzles a driver, crosses a bedroom and lights up the living room opposite. It is the most common mistake, and the most costly in neighbourly relations.
The neighbours, the bedroom behind the glass, the road
A window on the axis turns a floodlight into an involuntary night light for the house opposite. A light party wall reflects light into neighbouring rooms.
- The window opposite: out of the beam axis
- The public road: aimed strictly back from the boundary
- The light wall: reduced output or shifted aim
Aim, mask, reduce: three simple corrections
- Aim: a few degrees downward is often enough
- Mask: a deflector above the housing cuts the halo
- Reduce: a less powerful model, better placed, lights just as well
For terrace ambience, enhancing a terrace in the evening shows how to combine a floodlight with softer light. And if you are unsure about your setup, the Designix Google listing can be checked in one click.
In stock · shipping costs shown at checkout · up to 30% off in your cart


Ready to turn inspiration into reality?
Tell us about your room, your style and your budget, and we will show you the pieces that truly suit your project.
Get guidance in 30 seconds →